|
|
| Step | Inspection | Action |
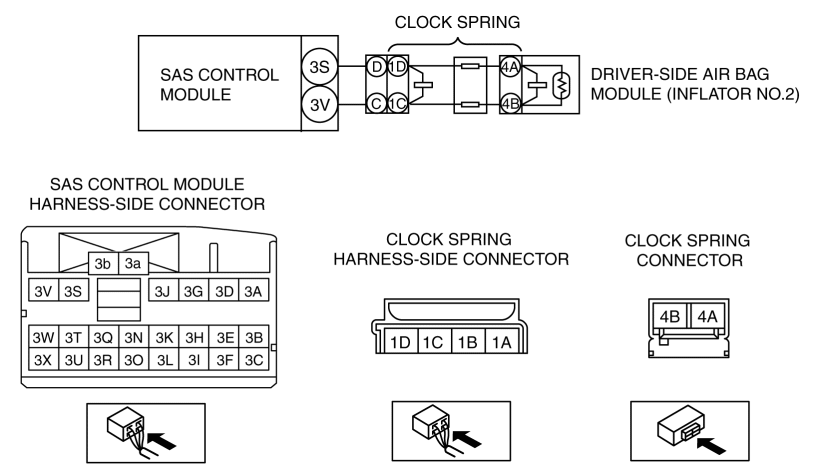
| 1 | INSPECT DRIVER-SIDE AIR BAG MODULE (INFLATOR NO.2) CONNECTOR
WARNING:
| Yes | Replace clock spring. (See CLOCK SPRING REMOVAL/INSTALLATION [TWO-STEP DEPLOYMENT CONTROL SYSTEM].) Then go to Step 7. |
| No | Go to the next step. |
| 2 | INSPECT CLOCK SPRING
NOTE:
| Yes | Go to the next step. |
| No | Replace clock spring. (See CLOCK SPRING REMOVAL/INSTALLATION [TWO-STEP DEPLOYMENT CONTROL SYSTEM].) Then go to Step 7. |
| 3 | INSPECT DRIVER-SIDE AIR BAG MODULE (INFLATOR NO.2) CIRCUIT FOR SHORT TO GROUND
NOTE:
| Yes | Refer to the wiring diagram and verify whether or not there is a common connector between SAS control module terminal and clock spring terminal.
If there is a common connector:
-
Determine the malfunctioning part by inspecting the common connector and the terminal for corrosion, damage, or pin disconnection, and the common wiring harness for a short to ground.
-
Replace the malfunctioning part.
Go to Step 7. |
| No | Go to the next step. |
| 4 | INSPECT DRIVER-SIDE AIR BAG MODULE (INFLATOR NO.2) CIRCUIT FOR OPEN CIRCUIT
NOTE:
| Yes | Go to the next step. |
| No | Refer to the wiring diagram and verify whether or not there is a common connector between SAS control module terminal and clock spring terminal.
If there is a common connector:
-
Determine the malfunctioning part by inspecting the common connector and the terminal for corrosion, damage, or pin disconnection, and the common wiring harness for an open circuit.
-
Replace the malfunctioning part.
Go to Step 7. |
| 5 | INSPECT DRIVER-SIDE AIR BAG MODULE (INFLATOR NO.2) CIRCUIT FOR SHORT TO POWER SUPPLY
NOTE:
| Yes | Go to the next step. |
| No | Refer to the wiring diagram and verify whether or not there is a common connector between SAS control module terminal and clock spring terminal.
If there is a common connector:
-
Determine the malfunctioning part by inspecting the common connector and the terminal for corrosion, damage, or pin disconnection, and the common wiring harness for a short to power supply.
-
Replace the malfunctioning part.
Go to Step 7. |
| 6 | INSPECT DRIVER-SIDE AIR BAG MODULE
-
Switch the ignition off.
-
Disconnect the negative battery cable and wait for 1 min or more.
-
Connect the SAS control module connectors.
-
Except for the driver-side air bag module (inflator No.2) connector, reconnect all disconnected connectors.
-
Connect the SST (Fuel and thermometer checker) or apply 2 ohms resistance to clock spring connector terminals 4A and 4B.
-
Set the SST (Fuel and thermometer checker) to 2 ohms.
-
Connect the negative battery cable. (See NEGATIVE BATTERY CABLE DISCONNECTION/CONNECTION [SKYACTIV-G 2.5].)
-
Switch the ignition ON (engine off or on).
-
Clear the DTC for the SAS control module using the M-MDS. (See CLEARING DTC [TWO-STEP DEPLOYMENT CONTROL SYSTEM].)
-
Perform the DTC inspection for the SAS control module using the M-MDS. (See DTC INSPECTION [TWO-STEP DEPLOYMENT CONTROL SYSTEM].)
-
Are the same DTCs present?
| Yes | Go to the next step. |
| No | Replace the driver-side air bag module. (See DRIVER-SIDE AIR BAG MODULE REMOVAL/INSTALLATION [TWO-STEP DEPLOYMENT CONTROL SYSTEM].) Then go to the next step. |
| 7 | PERFORM SAS CONTROL MODULE DTC INSPECTION
| Yes | Replace the SAS control module. (See SAS CONTROL MODULE REMOVAL/INSTALLATION [TWO-STEP DEPLOYMENT CONTROL SYSTEM].) |
| No | DTC troubleshooting completed. |