1. Disconnect the negative battery cable. (See NEGATIVE BATTERY CABLE DISCONNECTION/CONNECTION [SKYACTIV-G 2.5].)
2. Remove the following parts:a. A-pillar trim (RH) (See A-PILLAR TRIM REMOVAL/INSTALLATION.)b. Decoration panel (See DECORATION PANEL REMOVAL/INSTALLATION.)c. Center panel (See CENTER PANEL REMOVAL/INSTALLATION.)d. Audio unit (See AUDIO UNIT REMOVAL/INSTALLATION.)
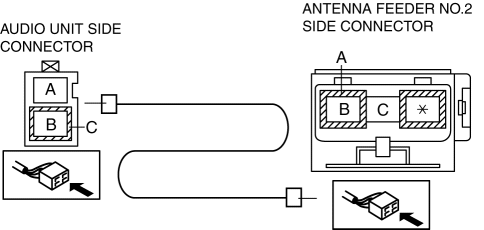
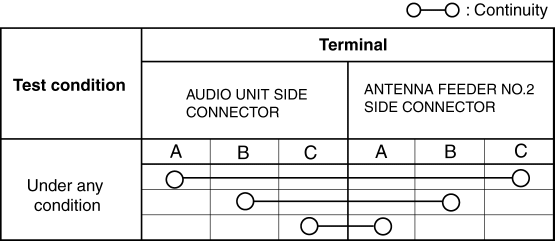
3. Disconnect antenna feeder No.2.
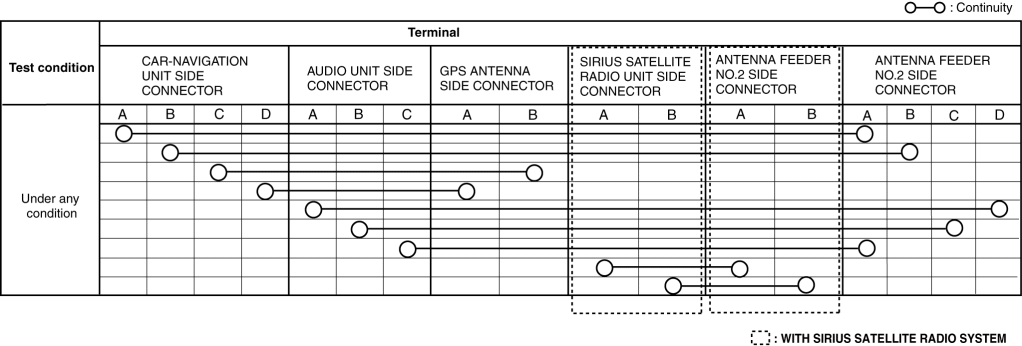
4. Verify that the continuity between antenna feeder No.1 terminals is as indicated in the table.
If not as indicated in the table, replace antenna feeder No.1.
1. Disconnect the negative battery cable. (See NEGATIVE BATTERY CABLE DISCONNECTION/CONNECTION [SKYACTIV-G 2.5].)
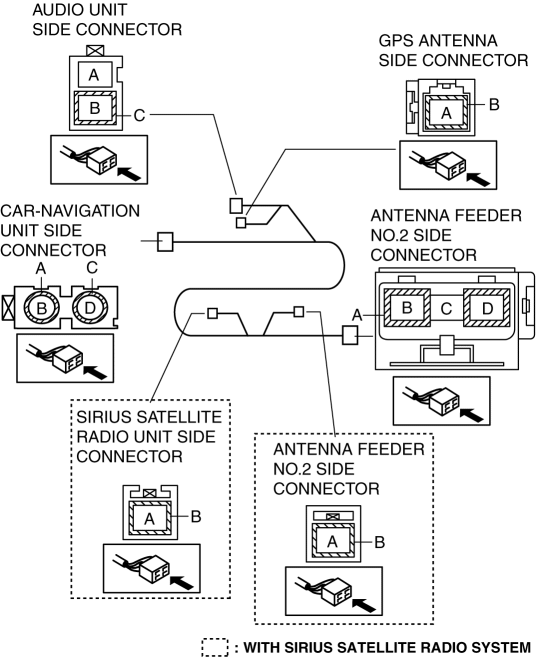
2. Remove the following parts:a. A-pillar trim (RH) (See A-PILLAR TRIM REMOVAL/INSTALLATION.)b. Decoration panel (See DECORATION PANEL REMOVAL/INSTALLATION.)c. Center panel (See CENTER PANEL REMOVAL/INSTALLATION.)d. Audio unit (See AUDIO UNIT REMOVAL/INSTALLATION.)e. Center speaker grille (See SPEAKER GRILLE REMOVAL/INSTALLATION.)f. Front center speaker (with Bose®)/front center speaker dummy (without Bose®) (See FRONT CENTER SPEAKER REMOVAL/INSTALLATION.)g. Pocket lid (See LOWER PANEL REMOVAL/INSTALLATION.)h. Car-navigation unit (See CAR-NAVIGATION UNIT REMOVAL/INSTALLATION.)
3. Disconnect the GPS antenna connector. (See GLOBAL POSITIONING SYSTEM (GPS) ANTENNA REMOVAL/INSTALLATION.)
4. Disconnect the SIRIUS satellite radio unit connector. (with SIRIUS satellite radio system) (See SIRIUS SATELLITE RADIO UNIT REMOVAL/INSTALLATION.)
5. Disconnect the Bluetooth unit connector. (with Bluetooth system) (See Bluetooth UNIT REMOVAL/INSTALLATION.)
6. Disconnect antenna feeder No.2.
7. Verify that the continuity between antenna feeder No.1 terminals is as indicated in the table.
If not as indicated in the table, replace antenna feeder No.1.