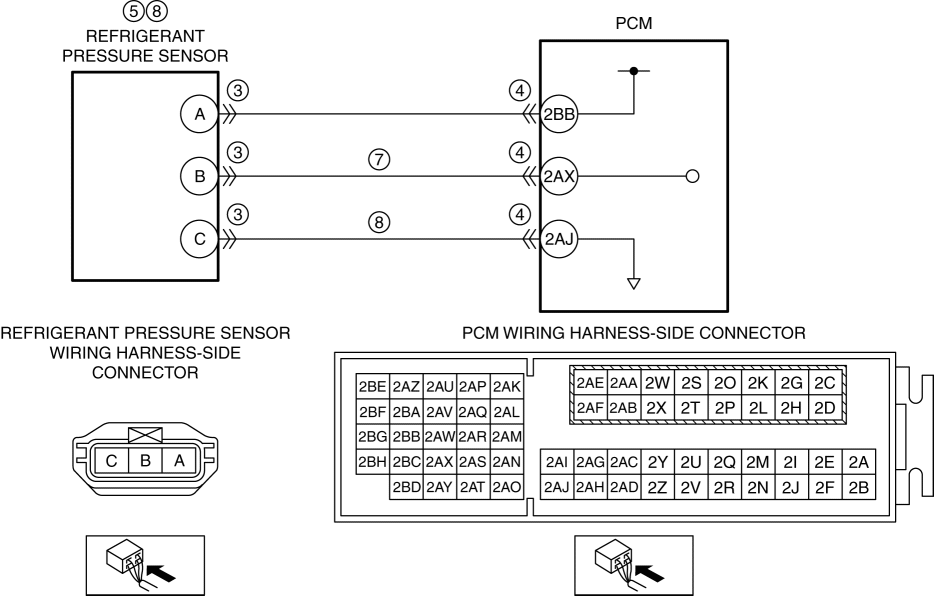
|
|
| STEP | INSPECTION | ACTION |
| 1 | VERIFY RELATED REPAIR INFORMATION AVAILABILITY
| Yes | Perform repair or diagnosis according to the available repair information.
|
| No | Go to the next step. |
| 2 | DETERMINE IF REFRIGERANT PRESSURE SENSOR OR WIRING HARNESS MALFUNCTION
| Yes | Go to Step 6. |
| No | Go to the next step. |
| 3 | INSPECT REFRIGERANT PRESSURE SENSOR CONNECTOR CONDITION
-
Switch the ignition off.
-
Disconnect the refrigerant pressure sensor connector.
-
Inspect for poor connection (such as damaged/pulled-out pins, corrosion).
-
Is there any malfunction?
| Yes | Repair or replace the connector and/or terminals, then go to Step 9. |
| No | Go to the next step. |
| 4 | INSPECT PCM CONNECTOR CONDITION
-
Disconnect the PCM connector.
-
Inspect for poor connection (such as damaged/pulled-out pins, corrosion).
-
Is there any malfunction?
| Yes | Repair or replace the connector and/or terminals, then go to Step 9. |
| No | Go to the next step. |
| 5 | INSPECT REFRIGERANT PRESSURE SENSOR
| Yes | Replace the refrigerant pressure sensor, then go to Step 9. (See REFRIGERANT PRESSURE SENSOR REMOVAL/INSTALLATION [MANUAL AIR CONDITIONER].) (See REFRIGERANT PRESSURE SENSOR REMOVAL/INSTALLATION [FULL-AUTO AIR CONDITIONER].) |
| No | Go to Step 9. |
| 6 | DETERMINE IF REFRIGERANT PRESSURE SENSOR SIGNAL CIRCUIT OR REFRIGERANT PRESSURE SENSOR GROUND CIRCUIT MALFUNCTION
-
Switch the ignition off.
-
Disconnect the refrigerant pressure sensor connector.
-
Access the AC_PRES PID using the M-MDS. (See ON-BOARD DIAGNOSTIC TEST [SKYACTIV-G 2.5].)
-
Verify the AC_PRES PID value.
-
Is the AC_PRES PID value 5 V or B+?
| Yes | Go to the next step. |
| No | Go to Step 8. |
| 7 | INSPECT REFRIGERANT PRESSURE SENSOR SIGNAL CIRCUIT FOR OPEN CIRCUIT
-
Verify that the refrigerant pressure sensor connector is disconnected.
-
Switch the ignition off.
-
Disconnect the PCM connector.
-
Inspect for continuity between refrigerant pressure sensor terminal B (wiring harness-side) and PCM terminal 2AX (wiring harness-side).
-
Is there continuity?
| Yes | Refer to the wiring diagram and verify whether or not there is a common connector between refrigerant pressure sensor terminal B and PCM terminal 2AX.
If there is a common connector:
-
Determine the malfunctioning part by inspecting the common connector and the terminal for corrosion, damage, or pin disconnection, and the common wiring harness for a short to power supply.
-
Repair or replace the malfunctioning part.
Go to Step 9. |
| No | Refer to the wiring diagram and verify whether or not there is a common connector between refrigerant pressure sensor terminal B and PCM terminal 2AX.
If there is a common connector:
-
Determine the malfunctioning part by inspecting the common connector and the terminal for corrosion, damage, or pin disconnection, and the common wiring harness for an open circuit.
-
Repair or replace the malfunctioning part.
Go to Step 9. |
| 8 | INSPECT REFRIGERANT PRESSURE SENSOR GROUND CIRCUIT FOR OPEN CIRCUIT
-
Verify that the refrigerant pressure sensor connector is disconnected.
-
Switch the ignition off.
-
Disconnect the PCM connector.
-
Inspect for continuity between refrigerant pressure sensor terminal C (wiring harness-side) and PCM terminal 2AJ (wiring harness-side).
-
Is there continuity?
| Yes | Replace the refrigerant pressure sensor, then go to the next step. (See REFRIGERANT PRESSURE SENSOR REMOVAL/INSTALLATION [MANUAL AIR CONDITIONER].) (See REFRIGERANT PRESSURE SENSOR REMOVAL/INSTALLATION [FULL-AUTO AIR CONDITIONER].) |
| No | Refer to the wiring diagram and verify whether or not there is a common connector between refrigerant pressure sensor terminal C and PCM terminal 2AJ.
If there is a common connector:
-
Determine the malfunctioning part by inspecting the common connector and the terminal for corrosion, damage, or pin disconnection, and the common wiring harness for an open circuit.
-
Repair or replace the malfunctioning part.
Go to the next step. |
| 9 | VERIFY DTC TROUBLESHOOTING COMPLETED
| Yes | Repeat the inspection from Step 1.
Go to the next step. |
| No | Go to the next step. |
| 10 | VERIFY AFTER REPAIR PROCEDURE
| Yes | Go to the applicable DTC inspection. (See DTC TABLE [SKYACTIV-G 2.5].) |
| No | DTC troubleshooting completed. |
