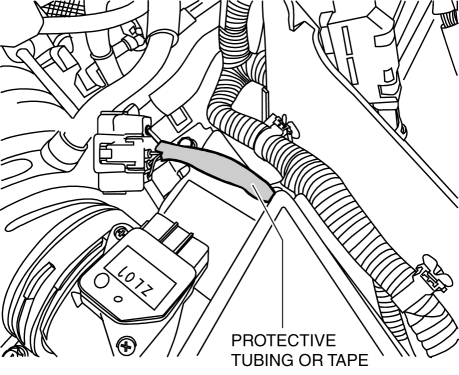
1. If tubing or tape is used to protect the connector wiring harness, cut into it being careful not cut or damage the wiring, and expose approx. 200 mm {7.84 in} of the wiring from the connector.
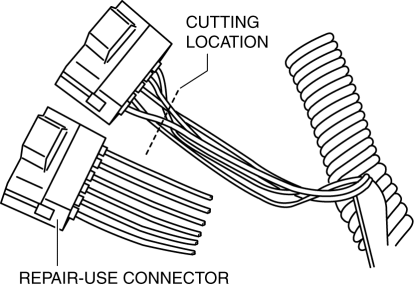
2. Cut the wiring harness once at the position near the connector so as to leave a long length of wiring harness on the vehicle side, align the length with the repair-use connector wiring harness, and then re-cut at the wiring harness on the vehicle side or the repair-use connector wiring harness at the appropriate position.
CAUTION:
Cut longer in consideration of the amount of wiring harness length which will be soldered.
If the cut wiring harness length is different than the repair-use wiring harness length, the following problems may occur.
If too short: Tension will be applied to the terminal, splice or connector resulting in an open circuit.
If too long: A short may occur due to pinching and wear of the extra length of wiring harness near the connector.
NOTE:
If several wiring harnesses are connected to the same connector, stagger the cut positions so that the repair positions do not overlap as shown in the figure to prevent thickening of the wiring harness after repair.

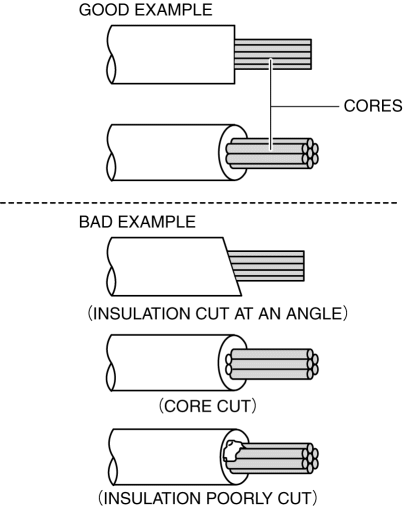
1. Cut off approx. 10—20 mm {0.39—0.79 in} from the ends of the wiring harness on the vehicle side and the wiring harness of the repair-use connector. (If the repair-use wiring harness is thick, core twisting can be facilitated by lengthening the amount of insulation cut)

CAUTION:
Do not damage or cut the cores of the wiring harnesses. After finishing the work, inspect the wiring harnesses for damage or cutting of the cores, and re-do the work if necessary.
2. Depending on the thickness of the wiring harness which is being repaired, select an appropriate heat shrinkable tube, and before twisting the cores together, pass them through the heat shrinkable tube.
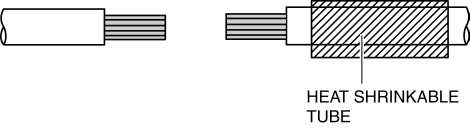
Heat shrinkable tube
Wiring size (exterior diameter)
Before shrinking
After shrinking
Small
4 mm {0.2 in}
1 mm {0.04 in}
φ2 mm {0.08 in} or less
Large
8 mm {0.3 in}
2 mm {0.08 in}
φ2 mm {0.08 in} or more
NOTE:
If the exposed area of the core in which the solder is applied is 10 mm {0.39 in}, half the length (25 mm {0.98 in}) of the heat shrinkable tubing can be cut and used because the total length of the heat shrinkable tubing is 50 mm {2.0 in}.
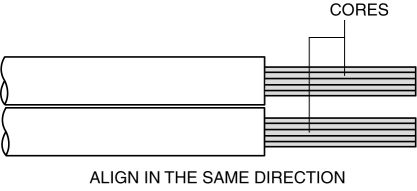
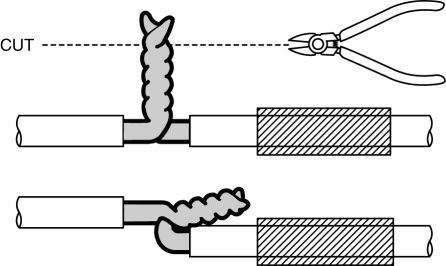
3. Line up the cores of the wiring harnesses to be connected as shown in the figure.
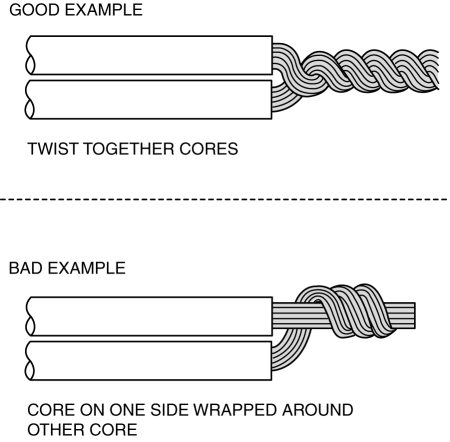
4. Twist together both of the cores.
1. Twist together firmly the cores of the wiring harnesses being connected and apply soldering in that area.
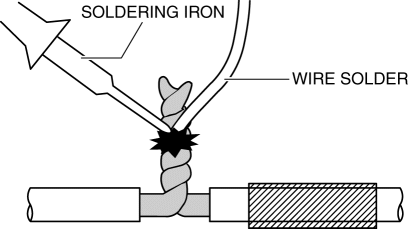
CAUTION:
Soldering for a long period of time could affect the surrounding electrical circuit. Apply soldering for an extremely short period of time.
2. Cut the ends off the connected area, and apply the soldering iron tip to the wiring harness after removing any fraying.
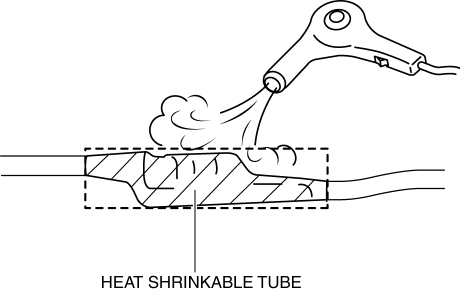
3. Set the heat shrinkable tubing to the soldered area and shrink the heat shrinkable tubing at a temperature of approx. 100 °C {212 °F} using a drier.CAUTION:
Completely shrink the heat shrinkable tubing to the wiring harness leaving no gaps.
Perform the work being careful not to melt the insulation of the wiring harness by excessive heat.
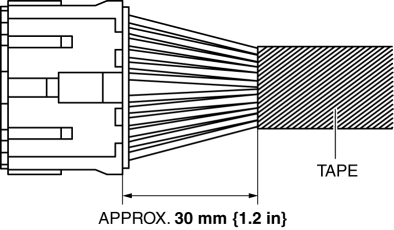
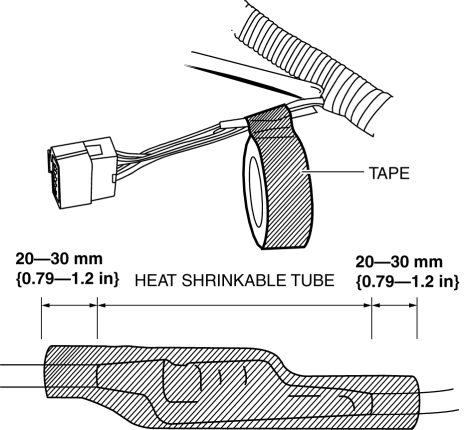
1. Tape the surface of the heat shrinkable tubing.
CAUTION:
Remove moisture, oil, and dust from the area to be taped before doing the taping.
Firmly tape the ends so that they do not peel off.
Always superimpose the tape while wrapping.
Wrap the tape approx. 20—30 mm {0.79—1.2 in} beyond both ends of the heat shrinkable tubing.
NOTE:
If the wiring harness is bundled and taped, bind it approx. 30 mm {1.2 in} away from the connector.