If the front power window motor does not operate as indicated in the table, replace it.
| Operation | Terminal |
|
| E | F |
|
| Close | B+ | Ground |
| Open | Ground | B+ |
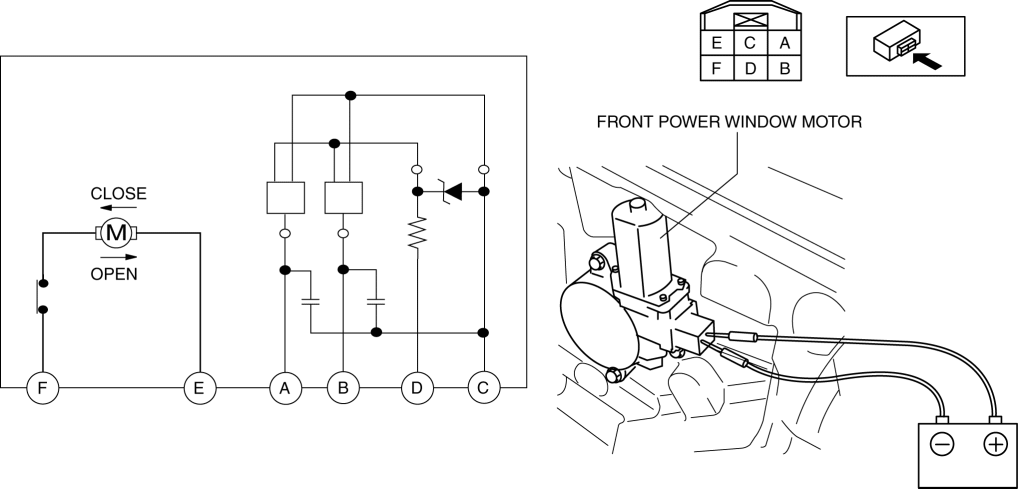
1. Disconnect the negative battery cable. (See NEGATIVE BATTERY CABLE DISCONNECTION/CONNECTION [SKYACTIV-G 2.5].)
2. Remove the inner garnish. (See INNER GARNISH REMOVAL/INSTALLATION.)
3. Remove the front door trim. (See FRONT DOOR TRIM REMOVAL/INSTALLATION.)
4. Disconnect the front power window motor connector.
5. Apply battery positive voltage and connect the ground to front power window motor terminals E and F, and then inspect the front power window motor operation.
If the front power window motor does not operate as indicated in the table, replace it.
Operation
Terminal
E
F
Close
B+
Ground
Open
Ground
B+
6. Connect the battery positive voltage to front power window motor terminal D and connect terminal C to ground.
7. Operate the front power window motor and verify the wave patterns for terminals A and B.
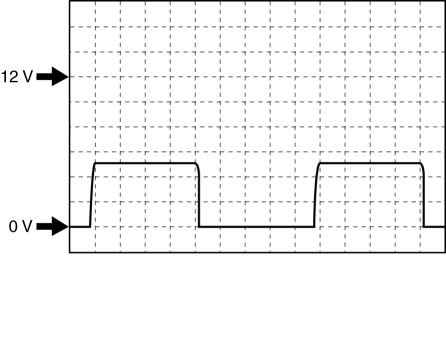
Terminal:
A, B(+) ↔ ground (-)
Oscilloscope setting: 2 V/DIV (Y), 1 ms/DIV (X), DC range
If the malfunction, replace the front power window motor.
1. Disconnect the negative battery cable. (See NEGATIVE BATTERY CABLE DISCONNECTION/CONNECTION [SKYACTIV-G 2.5].)
2. Remove the rear door trim. (See REAR DOOR TRIM REMOVAL/INSTALLATION.)
3. Disconnect the rear power window motor connector.
4. Apply battery positive voltage and connect the ground to rear power window motor terminals E and F, and then inspect the rear power window motor operation.
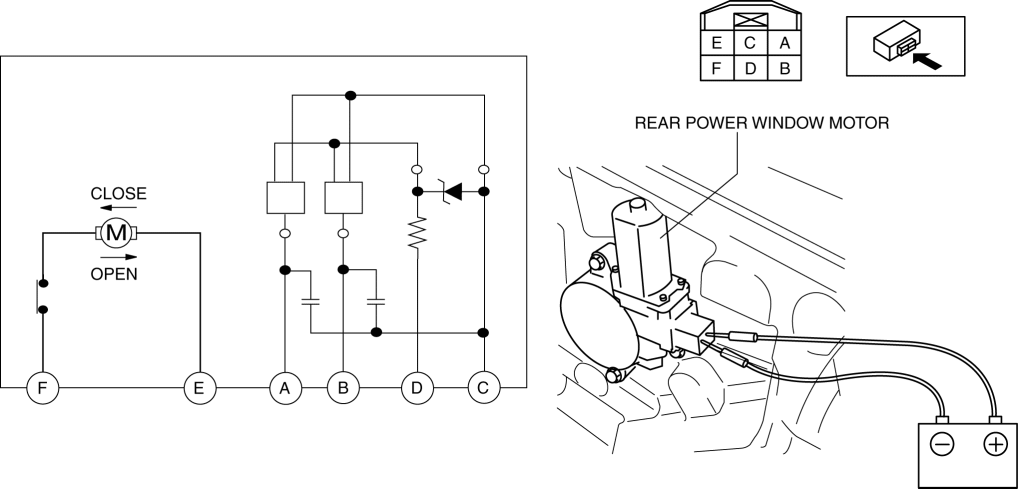
If the rear power window motor does not operate as indicated in the table, replace it.
Operation
Terminal
E
F
Close
B+
Ground
Open
Ground
B+
5. Connect the battery positive voltage to rear power window motor terminal D and connect terminal C to ground.
6. Operate the rear power window motor and verify the wave patterns for terminals A and B.
Terminal:
A, B(+) ↔ ground (-)
Oscilloscope setting: 2 V/DIV (Y), 1 ms/DIV (X), DC range
If the malfunction, replace the rear power window motor.