< Previous   Next >

2014 - Mazda6 - Body and Accessories

DTC: U3000:09, 09:Er21 [AUDIO]

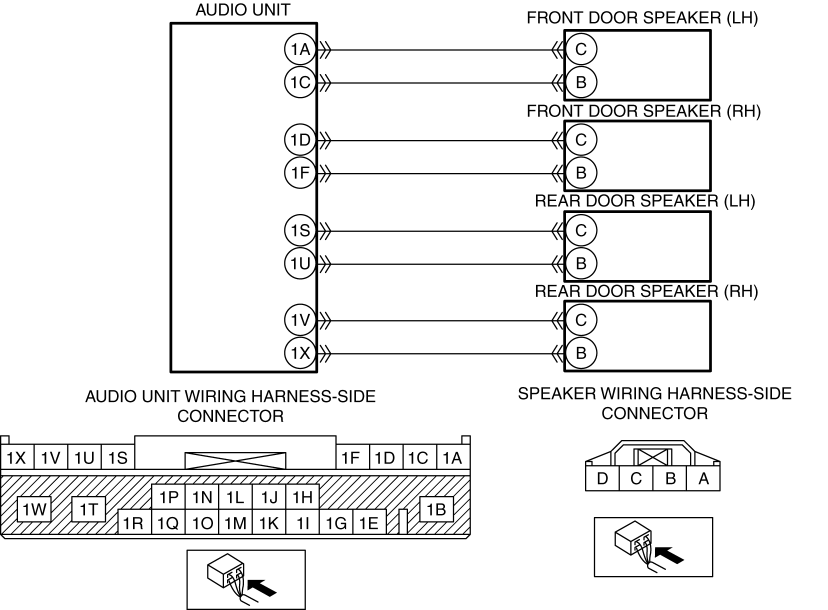
Without Bose®


Description

Audio unit internal malfunction

Detection condition

  • Audio unit (circuit around power amplifier) malfunction detected

  • Audio unit protection function operates due to short to ground in speaker wiring harness and speaker lead wire

Fail-safe function

Output to speakers stops

Possible cause

  • Audio unit connector or terminal malfunction

  • Speaker connector or terminal malfunction

  • Open circuit in wiring harness between the following terminals:

    • Audio unit terminal 1A and front door speaker (LH) terminal C

    • Audio unit terminal 1C and front door speaker (LH) terminal B

    • Audio unit terminal 1D and front door speaker (RH) terminal C

    • Audio unit terminal 1F and front door speaker (RH) terminal B

    • Audio unit terminal 1S and rear door speaker (LH) terminal C

    • Audio unit terminal 1U and rear door speaker (LH) terminal B

    • Audio unit terminal 1V and rear door speaker (RH) terminal C

    • Audio unit terminal 1X and rear door speaker (RH) terminal B

  • Short to ground in wiring harness between the following terminals:

    • Audio unit terminal 1A and front door speaker (LH) terminal C

    • Audio unit terminal 1C and front door speaker (LH) terminal B

    • Audio unit terminal 1D and front door speaker (RH) terminal C

    • Audio unit terminal 1F and front door speaker (RH) terminal B

    • Audio unit terminal 1S and rear door speaker (LH) terminal C

    • Audio unit terminal 1U and rear door speaker (LH) terminal B

    • Audio unit terminal 1V and rear door speaker (RH) terminal C

    • Audio unit terminal 1X and rear door speaker (RH) terminal B

  • Speaker malfunction

  • Audio unit malfunction


Diagnostic Procedure

Step

Inspection

Action

1

    INSPECT AUDIO UNIT CONNECTOR CONDITION
  • Switch the ignition off (LOCK).

  • Disconnect the negative battery cable.

    (See NEGATIVE BATTERY CABLE DISCONNECTION/CONNECTION [SKYACTIV-G 2.5].)

  • Disconnect the audio unit connector.

  • Inspect the connector engagement and connection condition and inspect the terminals for damage, deformation, corrosion, or disconnection.

  • Is there any malfunctioning part?

Yes

Repair or replace the connector, then go to Step 6.

No

Go to the next step.

2

    INSPECT SPEAKER CONNECTOR CONDITION
  • Disconnect the speaker connector.

  • Inspect the connector engagement and connection condition and inspect the terminals for damage, deformation, corrosion, or disconnection.

  • Is there any malfunctioning part?

Yes

Repair or replace the connector, then go to Step 6.

No

Go to the next step.

3

    INSPECT SPEAKER CIRCUIT FOR OPEN CIRCUIT
  • Audio unit connector and speaker connector are disconnected.

  • Inspect for continuity between the following terminals (vehicle wiring harness).

    • Audio unit terminal 1A and front door speaker (LH) terminal C

    • Audio unit terminal 1C and front door speaker (LH) terminal B

    • Audio unit terminal 1D and front door speaker (RH) terminal C

    • Audio unit terminal 1F and front door speaker (RH) terminal B

    • Audio unit terminal 1S and rear door speaker (LH) terminal C

    • Audio unit terminal 1U and front door speaker (LH) terminal B

    • Audio unit terminal 1V and rear door speaker (RH) terminal C

    • Audio unit terminal 1X and rear door speaker (RH) terminal B

  • Is there continuity?

Yes

Go to the next step.

No

Refer to the wiring diagram and verify if there is a common connector between the following terminals (vehicle wiring harness side).

  • Audio unit terminal 1A and front door speaker (LH) terminal C

  • Audio unit terminal 1C and front door speaker (LH) terminal B

  • Audio unit terminal 1D and front door speaker (RH) terminal C

  • Audio unit terminal 1F and front door speaker (RH) terminal B

  • Audio unit terminal 1S and rear door speaker (LH) terminal C

  • Audio unit terminal 1U and front door speaker (LH) terminal B

  • Audio unit terminal 1V and rear door speaker (RH) terminal C

  • Audio unit terminal 1X and rear door speaker (RH) terminal B

    If there is a common connector:
  • Determine the malfunctioning part by inspecting the common connector and the terminal for corrosion, damage, or pin disconnection, and the common wiring harness for an open circuit.

  • Repair or replace the malfunctioning part.

    If there is no common connector:
  • Repair or replace the wiring harness which has an open circuit.

Go to Step 6.

4

    INSPECT SPEAKER CIRCUIT FOR SHORT TO GROUND
  • Inspect for continuity between the following wiring harness terminals (vehicle wiring harness side) and body ground.

    • Speaker terminal C

    • Speaker terminal B

  • Is there continuity?

Yes

Refer to the wiring diagram and verify if there is a common connector between the following terminals (vehicle wiring harness side).

  • Speaker terminal C

  • Speaker terminal B

    If there is a common connector:
  • Determine the malfunctioning part by inspecting the common connector and the terminal for corrosion, damage, or pin disconnection, and the common wiring harness for a short to ground.

  • Repair or replace the malfunctioning part.

    If there is no common connector:
  • Repair or replace the wiring harness which has a short to ground.

Go to Step 6.

No

Go to the next step.

5

Yes

Replace the speaker, then go to Step 6.

(See FRONT DOOR SPEAKER REMOVAL/INSTALLATION.)

(See REAR DOOR SPEAKER REMOVAL/INSTALLATION.)

No

Go to the next step.

6

Yes

Return to Step 1 and inspect for other possible causes. If the malfunction recurs, replace the audio unit, then go to the next step.

(See AUDIO UNIT REMOVAL/INSTALLATION.)

No

Go to the next step.

7

    VERIFY IF OTHER DTCs DISPLAYED
  • Are any other DTCs displayed?

Yes

Repair the malfunctioning part according to the applicable DTC troubleshooting.

(See DTC TABLE [AUDIO].)

No

DTC troubleshooting completed.


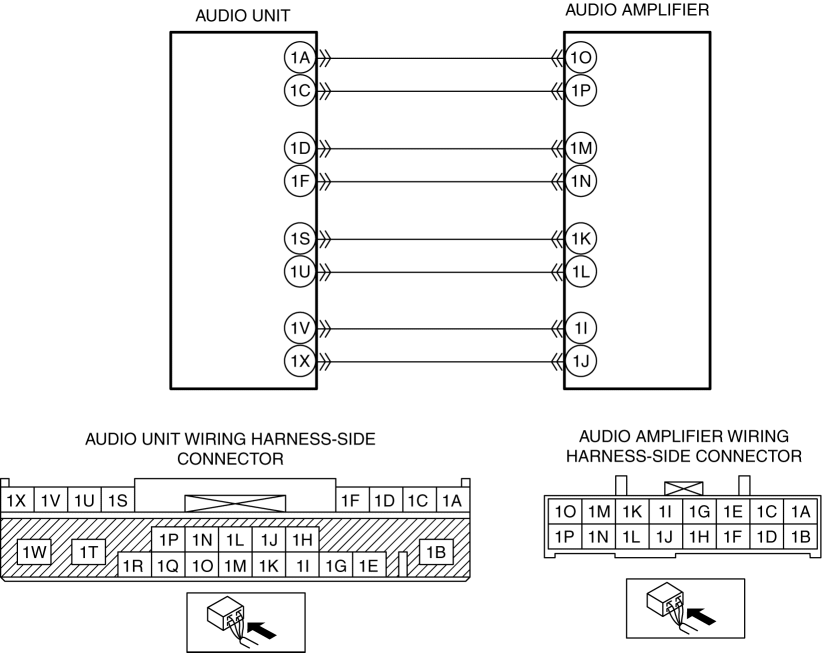
With Bose®


Description

Audio unit internal malfunction

Detection condition

  • Audio unit (circuit around power amplifier) malfunction detected

  • Audio unit protection function operates due to short to ground in speaker wiring harness and speaker lead wire

Fail-safe function

Output to speakers stops

Possible cause

  • Audio unit connector or terminal malfunction

  • Speaker connector or terminal malfunction

  • Open circuit in wiring harness between the following terminals:

    • Audio unit terminal 1A and audio amplifier terminal 1O

    • Audio unit terminal 1C and audio amplifier terminal 1P

    • Audio unit terminal 1D and audio amplifier terminal 1M

    • Audio unit terminal 1F and audio amplifier terminal 1N

    • Audio unit terminal 1S and audio amplifier terminal 1K

    • Audio unit terminal 1U and audio amplifier terminal 1L

    • Audio unit terminal 1V and audio amplifier terminal 1I

    • Audio unit terminal 1X and audio amplifier terminal 1J

  • Short to ground in wiring harness between the following terminals:

    • Audio unit terminal 1A and audio amplifier terminal 1O

    • Audio unit terminal 1C and audio amplifier terminal 1P

    • Audio unit terminal 1D and audio amplifier terminal 1M

    • Audio unit terminal 1F and audio amplifier terminal 1N

    • Audio unit terminal 1S and audio amplifier terminal 1K

    • Audio unit terminal 1U and audio amplifier terminal 1L

    • Audio unit terminal 1V and audio amplifier terminal 1I

    • Audio unit terminal 1X and audio amplifier terminal 1J

  • Speaker malfunction

  • Audio unit malfunction


Diagnostic Procedure

Step

Inspection

Action

1

    INSPECT AUDIO UNIT CONNECTOR CONDITION
  • Switch the ignition off (LOCK).

  • Disconnect the negative battery cable.

    (See NEGATIVE BATTERY CABLE DISCONNECTION/CONNECTION [SKYACTIV-G 2.5].)

  • Disconnect the audio unit connector.

  • Inspect the connector engagement and connection condition and inspect the terminals for damage, deformation, corrosion, or disconnection.

  • Is there any malfunctioning part?

Yes

Repair or replace the connector, then go to Step 5.

No

Go to the next step.

2

    INSPECT AUDIO AMPLIFIER CONNECTOR CONDITION
  • Disconnect the audio amplifier connector.

  • Inspect the connector engagement and connection condition and inspect the terminals for damage, deformation, corrosion, or disconnection.

  • Is there any malfunctioning part?

Yes

Repair or replace the connector, then go to Step 5.

No

Go to the next step.

3

    INSPECT AUDIO AMPLIFIER CIRCUIT FOR OPEN CIRCUIT
  • Audio unit connector and audio amplifier connector are disconnected.

  • Inspect for continuity between the following terminals (vehicle wiring harness).

    • Audio unit terminal 1A and audio amplifier terminal 1O

    • Audio unit terminal 1C and audio amplifier terminal 1P

    • Audio unit terminal 1D and audio amplifier terminal 1M

    • Audio unit terminal 1F and audio amplifier terminal 1N

    • Audio unit terminal 1S and audio amplifier terminal 1K

    • Audio unit terminal 1U and audio amplifier terminal 1L

    • Audio unit terminal 1V and audio amplifier terminal 1I

    • Audio unit terminal 1X and audio amplifier terminal 1J

  • Is there continuity?

Yes

Go to the next step.

No

Refer to the wiring diagram and verify if there is a common connector between the following terminals (vehicle wiring harness side).

  • Audio unit terminal 1A and audio amplifier terminal 1O

  • Audio unit terminal 1C and audio amplifier terminal 1P

  • Audio unit terminal 1D and audio amplifier terminal 1M

  • Audio unit terminal 1F and audio amplifier terminal 1N

  • Audio unit terminal 1S and audio amplifier terminal 1K

  • Audio unit terminal 1U and audio amplifier terminal 1L

  • Audio unit terminal 1V and audio amplifier terminal 1I

  • Audio unit terminal 1X and audio amplifier terminal 1J

    If there is a common connector:
  • Determine the malfunctioning part by inspecting the common connector and the terminal for corrosion, damage, or pin disconnection, and the common wiring harness for an open circuit.

  • Repair or replace the malfunctioning part.

    If there is no common connector:
  • Repair or replace the wiring harness which has an open circuit.

Go to Step 5.

4

    INSPECT AUDIO AMPLIFIER CIRCUIT FOR SHORT TO GROUND
  • Inspect for continuity between the following wiring harness terminals (vehicle wiring harness side) and body ground.

    • Audio amplifier terminal 1O

    • Audio amplifier terminal 1P

    • Audio amplifier terminal 1M

    • Audio amplifier terminal 1N

    • Audio amplifier terminal 1K

    • Audio amplifier terminal 1L

    • Audio amplifier terminal 1I

    • Audio amplifier terminal 1J

  • Is there continuity?

Yes

Refer to the wiring diagram and verify if there is a common connector between the following terminals (vehicle wiring harness side).

  • Audio amplifier terminal 1O

  • Audio amplifier terminal 1P

  • Audio amplifier terminal 1M

  • Audio amplifier terminal 1N

  • Audio amplifier terminal 1K

  • Audio amplifier terminal 1L

  • Audio amplifier terminal 1I

  • Audio amplifier terminal 1J

    If there is a common connector:
  • Determine the malfunctioning part by inspecting the common connector and the terminal for corrosion, damage, or pin disconnection, and the common wiring harness for a short to ground.

  • Repair or replace the malfunctioning part.

    If there is no common connector:
  • Repair or replace the wiring harness which has a short to ground.

Go to the next step.

No

Go to the next step.

5

Yes

Return to Step 1 and inspect for other possible causes. If the malfunction recurs, replace the audio unit, then go to the next step.

(See AUDIO UNIT REMOVAL/INSTALLATION.)

No

Go to the next step.

6

    VERIFY IF OTHER DTCs DISPLAYED
  • Are any other DTCs displayed?

Yes

Repair the malfunctioning part according to the applicable DTC troubleshooting.

(See DTC TABLE [AUDIO].)

No

DTC troubleshooting completed.


< Previous   Next >
Back to Top
© 2012 Mazda North American Operations, U.S.A.